Add an author bar to a page
- Applies to:
- All versions
- Role required:
- Admin
Use custom CSS to personalize your documentation with details about the author or show article stats.
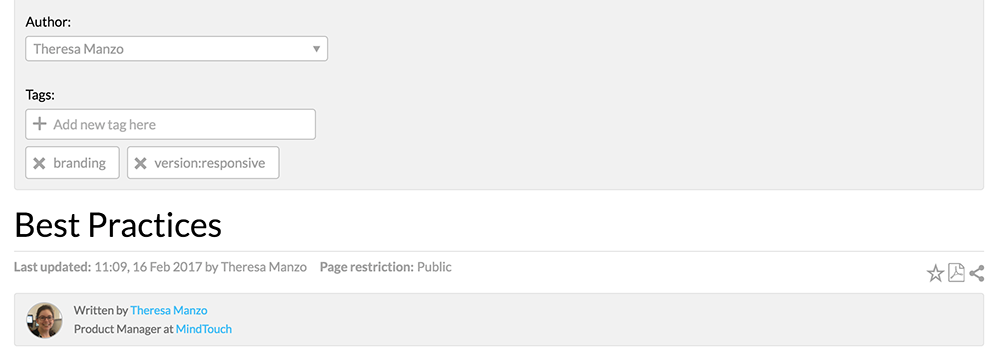
A custom author bar can display the author's image, name, job title, and company.

Prerequisites
- Admin access to Expert
- Capability to add custom site CSS to the Control Panel
Create a custom classification for your authors
- Navigate to Site tools > Control Panel > Systems Settings > Classifications.
- Create a custom Classification "authorname" for your site authors. If you have an existing author Classification to use, modify the reference the Dekiscript code example below to match.
- Add the following example code into your custom content header template located at
/Template:Custom/Views/ContentHeader, and modify as needed.var tagList = map.keyvalues(page.tags); var authorName = ''; // Add author information in this object. Replace the existing names and information with your own. var authors = { "theresam": { "name": "Theresa Manzo", "nameurl": "https://www.linkedin.com/in/theresa-manzo-92788154", "nametitle": "Product Manager", "companyname": "MindTouch", "companyurl": "https://mindtouch.com", "pictureurl": "https://success.mindtouch.com/%40api/deki/files/18350/%3Dtheresa_manzo?origin=mt-web" }, "lilym": { "name": "Lily Moessel", "nameurl": "https://www.linkedin.com/in/lily-m-7097048", "nametitle": "Documentation Architect", "companyname": "MindTouch", "companyurl": "https://mindtouch.com", "pictureurl": "https://success.mindtouch.com/%40api/deki/files/18349/%3Dlily_moessel?origin=mt-web" } }; // End author information // Look through the page's tag list, find the one for 'authorname', display the bar with the correct information foreach(var tag in tagList where string.contains(tag.key, 'authorname:')) { var authorName = string.replace(tag.value.name, 'authorname:', '', true); if(authorName) { <div class="mt-author-container"> <ul> // Only show the image if there is a URL defined if (authors[authorName].pictureurl) { <li class="mt-author-image mt-author-image-crop"><img src=(authors[authorName].pictureurl) title=(authors[authorName].name) /></li> } <li class="mt-author-information"> <span class="mt-author-written"> 'Written by ' </span> if(authors[authorName].nameurl) { <a rel="external" target="_blank" href=(authors[authorName].nameurl)> authors[authorName].name </a> } else { authors[authorName].name; } </li> // Only show this section if a companyname is set if(authors[authorName].companyname) { <li class="mt-author-companyname"> if(authors[authorName].nametitle) { <span class="mt-author-nametitle"> <span> authors[authorName].nametitle </span> <span> ' at ' </span> </span> } if(authors[authorName].companyurl) { <a rel="external" target="_blank" href=(authors[authorName].companyurl)> authors[authorName].companyname </a> } else { <span> authors[authorName].companyname </span> } </li> } </ul> </div> } } - Save your page after updating your author information in the
var authorsobject. You will need to use your Classification tag to identify each author in the object.

- If you called your custom classification by a different prefix, then you will need to update references to
authornamein the following piece of code with the prefix of the classification you are using.

- Navigate to Site tools > Control Panel > Branding > Custom Site CSS.
- In the All Roles CSS text field, add the following CSS.
/* author bar */ .mt-author-container { background: @secondary-container-background-color; border: 1px solid @secondary-container-border-color; border-radius: @border-radius-default; clear: both; color: @tertiary-font-color; font-size: 85%; margin: 0 0 1em; overflow: hidden; padding: .5em 1em; } .mt-author-container ul { list-style: none; margin: 0; padding: 0; } .mt-author-container .mt-author-image { float: left; margin: 0 1em 0 0; } .mt-author-container .mt-author-image-crop { border: 1px solid @primary-container-border-color; border-radius: 50%; height: 3em; overflow: hidden; position: relative; width: 3em; } .mt-author-container .mt-author-image-crop img { display: inline; height: 100%; margin: 0 auto; width: auto; } .mt-author-container img { max-height: 3em; max-width: 3em; vertical-align: middle; } - Click Save.
To verify your author bar works, navigate to an article with an author already assigned and you should see your new author bar.

